Tuesday, January 24, 2023

My New Sewing Machine! Janome HD5000BE

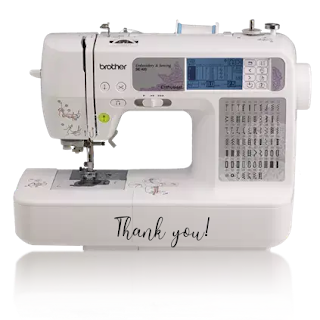
Before I get into the fun stuff with my new sewing machine, I would like to say a fond farewell to my Brother SE-400. It gave me many good years of sewing and I'm sad to see it go, I just don't use the embroidery like I thought I would and I needed a machine that can handle thicker layers since I'm getting more into bag making. 


With that being said, my new machine is a Janome HD5000BE, I LOVE this machine. It's mechanical so there was a slight learning curve for me, but other than that it has been a joy to use so far. The threading is easy and it still has a top loading bobbin that I was already used to, I think it's a great next step up for me since I'm no where near ready (and don't have the space) for an industrial. 
It does everything I need it to without all of the bells and whistles, it is sturdy, and the stitches look fantastic. I keep the zipper foot on 95% of the time but when you do have to switch feet it is a low shank machine so the snap on ones are great, but if you do have to switch the whole foot out that's easy too with the screwdriver. My machine came with the quilting kit which came with extra feet, which will be nice if I ever need them but for now this is great. I found an extra narrow low shank zipper foot which has become my favorite.
The HD stands for Heavy Duty and yes it can handle multiple layers of faux leather, vinyl and even denim. I wanted to get into more than pouches with different materials and I am confident I won't have any issues with this machine. I will post some of my projects at a later time, but for now, back to sewing!


Tuesday, December 6, 2022

Corjl Update


Since my last post I have decided to cancel my membership with Corjl and find something else to do with my collection of digital items. I'm not sure if the market is oversaturated or if my SEO needs work (or both) but not only did I not sell anything, my items didn't get any traffic. So I'm going to turn my focus to other projects for the time being. 

I recently got a new sewing machine so I think I may do a review. This is going to be a short post, but I am planning on being more active in the coming year, and hopefully have more physical products listed on my Etsy shop.

Tuesday, November 8, 2022

Making Invitatons with Corjl


-This is not a sponsored post.


I am a collector, I'm not sure if a lot other crafty people are, but as someone with (undiagnosed) ADHD I think it's one of my quirks. I like to collect craft supplies and that includes clip art. I have folders upon folders of clip art and I had really, nothing to do with them, well, now I do. I've started working with Corjl, and if you've ever purchased an editable item on Etsy you've probably seen listings with it before. I had used it a few times to make my kids their party invites and I didn't have any issues with the process. 

Right now (as of November 2022) They are offering a 2 week free trial if you want to make some designs and give it a whirl. I have my designs tied to my Etsy store, but you can also use Shopify. When you sign up you are given access to a digital folder with lots of resources for your store listings, as well as logos.

I am going to give a very simple overview of how it works. When you open your seller account you can choose to start a new design. Once you choose your size parameters you can start the design process. Upload your images (make sure you have the proper licenses) and  you can drag and drop your images into the artboard and make it look how you want. You can go to the fonts tab and choose the fonts they have available or you can subscribe to their Creative Fabrica font package. If you already have a CF subscription, you can't link them, I tried. 

After your design is how you want it you need to download a copy to use in your listings. Once you do this you need to create a listing in Corjl to match up to the listing in your Shop. OH! one thing I forgot to mention was you get a DEMO of your product! Your customer can try it out and see if it works for them before purchasing, and then they can purchase right from the demo. Your demo link is on the Listing page for that particular item. I recommend trying everything out first before you publish your listing on your shop. You also attach your etsy (or shopify) listing number, to the listing in Corjl. It sounds like a lot, but honestly it's not too bad once you get used to the interface.

That's the jist of it, honestly there's a bit more to cover but if you have a ton of graphics like I do and have no idea what to do with them, this is a good way to use them and make passive income. If you give Corjl a try, let me know what you think!


Here are some birthday invites I made up using the graphics I hoard and Corjl.


You can click on my Etsy button on the right of the blog to find the invites if you're interested in purchasing. 

Enjoy!

Monday, January 17, 2022

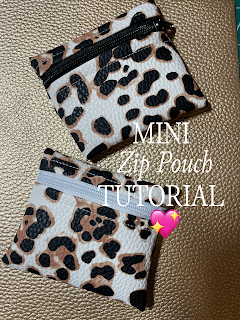
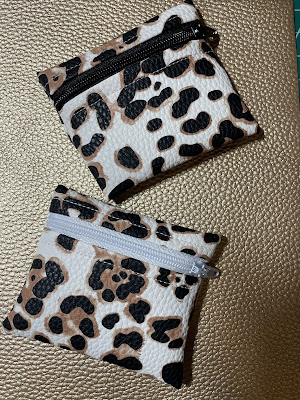
Mini Faux Leather Zip Pouch Tutorial


 If you're looking for a super fast, easy zipper pouch to make I have the perfect one for you right here on the blog. With these I am using faux leather so there is no need for interfacing, however if you decide to use cotton fabric you can easily add some fusible interfacing and follow the same pattern.


For these pouches I have made them in mini sizes but if you want to size them up for a larger pouch the steps are the same.

All you need is 

1 piece of faux leather (mine is 4"x6")

The best patterns for this are ones that have allover or multidirectional patterns, if not your pattern will end upside down on one side.


1 craft zipper

Wonder Clips (you really don't even need them) 

That is it

Step 1:

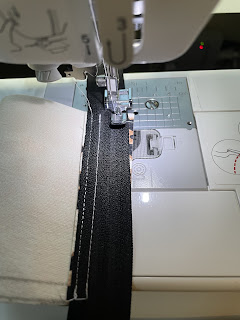
With your faux leather pretty side up, put your zipper tape face down and sew together using your zipper foot.


Step 2:

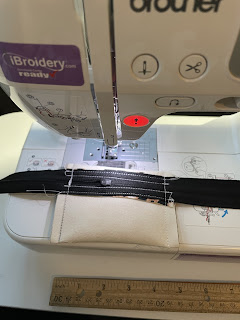
Turn your project over and finger press the zipper and faux leather open. Topstitch down the entire length of the pouch


Step 3:

Fold the other raw edge up to your zipper tape and repeat step 1


Step 4:

Open your zipper to turn the project right side out, topstitch down.


Step 5:

Zip back up but leave the zipper pull within the barriers of your project! If not you'll have a non working bag!
Leaving about 1/4" at the top of the bag, make sure your zipper tape is together and sew up both sides.
(If you are making a larger pouch you can leave about 1"-1 1/2" space at the top.


Step 6:


Trim excess zipper from both sides, if you want to and have a lighter on hand you can quickly seal the edges where you cut the zipper tape.


Step 7:

Turn project right side out through the zipper and poke out your corners. 

You are done!

So simple, so cute! I love to play around with different leather/zipper combinations.


Happy Sewing!

Sunday, July 18, 2021

Resin is not for me

No pictures in this post because I'm annoyed. I found something in the craft world that I absolutely hate working with. RESIN. I only worked with UV resin and only one brand, but from what I experienced, I can confidently say, I won't work with resin ever again. 

It smells, it's messy, it's STICKY and just not my favorite thing. This is something I have zero patience for. I'm so impressed by the people who make it look easy because, crafty people...it is not. 

My first attempt was keychains. Those weren't too bad, I used glitter with them and only did one side. My UV light wasn't adequate so I ended up upgrading but that was another issue. I had also tried badge reels but I couldn't get them to lay flat after curing and they were a mess. I guess my feeling is I have so many other projects that I have going at once and this one in particular was causing me stress and anxitey and frankly wasn't worth my time anymore. I would sit in my craft room for hours wanting to create something but had a block about it because the resin was sitting there taunting me. 

Recently I have been doing a lot of cleaning out of my supplies and decided that they ( and 11 garbage bags of yarn) needed to go. As of now July 2021, there is a lot of supplies available. Contact me through my Facebook page if you are interested. Once they are gone I will update the post. I normally will take longer to see if something is for me or not, but after the last two attempts and getting frustrated I just decided it's best to walk away from it. 

I will still be doing work with vinyl, still be sewing, knitting and crocheting. But as far as making keychains or anything with Resin, if you have something I've made that's going to be it. Mercifully, for my wallet, this is one hobby I won't be going any further into.

Thursday, February 11, 2021

Digital Art and Procreate


 Because I am the luckiest woman ever, and because he’s pretty awesome, my husband recently got me a brand new iPad Pro with 2nd gen Apple Pencil. I knew I wanted to start designing using my iPad so I downloaded Procreate. It isn’t free, it’s $9.99 but that’s it, it’s a one time purchase and all of the amazing features and tools are yours. No in-app purchases are required. I mostly plan on using it to make design elements for sublimation and other online design mediums. It is a lot of fun to play with and there is so much to learn. 

To overly simplify it, procreate is a digital medium to create pretty much anything you want. I’ve only had it for a couple of weeks so I haven’t even scratched the surface of what it can do. But I have watched a few tutorials and videos on YouTube and am excited to dive in further. These are two of the projects I've made so far with very limited drawing experience. I would highly recommend this app if you are thinking of trying digital art. 


Thursday, January 14, 2021

Bye Bye Printful

 If anyone has been wondering how the Printful experiment went, well, it was ok. I have to say I had zero issues with the products themselves, they were very good quality and the print quality was also great. 

My issue was, and maybe it was just because of the kind of Etsy store I have, is that it didn't really fit in what I was looking for. My profit margin just wasn't there and I know I'm not alone. If you start off with a shirt that costs $13 and add in shipping, that shirt is costing you at minimum $17, say you are selling the shirt for $22-$25, your profit is less than $10 per shirt. Where as I can get a blank shirt from All Day Shirts for less than $2 each, cut out my own design from my vinyl stash for less than $1 and all of the profit is mine.

I don't sell a lot of shirts or physical products anymore anyway so losing the POD (Print on Demand) part of my Etsy won't hurt my sales much. In fact, my plan is to take the designs that I did have on Printful, redo and revamp some of them so they are SVG's and sell those. That way I can share my designs with other crafters and not have any of the overhead once the design is complete.


Monday, January 11, 2021

Blog Redesign!

 It's been a long time, but I finally redesigned the blog! I have wanted to do it for years, but like anything that is for myself I was being too picky and indecisive so I just put it off. And finally after the dumpster fire of a year that was 2020, I decided that I wouldn't put it off any longer and did the redesign for this year.


I used elements I downloaded from Creative Fabrica for the font and the graphic elements. I ended up making some adjustments but overall I'm really happy with the new, simple, elegant look. I will be uploading new designs to the shop soon, but my design time has been cut down with having the kids home doing virtual school. 

Monday, July 20, 2020

Creative Fabrica

Disclaimer: This is an affiliate post, which means that if you purchase any products or sign up for a subscription using my links, I will receive money for it.

 But this post has some cool stuff in it. because recently I have discovered Creative Fabrica! This amaaazing website has literally tens of THOUSANDS of Fonts, Graphics and Craft files for you to choose from.
This is my absolute favorite font right now, i love glitter 


I am an All Access Subscriber, which means that I pay a monthly fee to access all of the fonts, graphics and craft files. They also have daily freebies and fantastic bundle packages that can contain hundreds of files. 


The best part is they all come with Commercial licenses. So if you are using fonts to make SVG files or any projects for sale, you can do so without worry about Copyright issues. 


Here is my Affiliate Link, if you click through and decide to subscribe please do so using my link.

Thank you!

Friday, May 1, 2020

DIY Masks!

Hello everyone! I hope you are all staying safe! I wanted to show a step by step guide of how I make my face masks.
The pattern I used can be found here at Hello Sewing I will note that in the pattern is says to do a 1/2" seam allowance, this ended up being too much and the masks were coming out too small so I have been doing 1/4" for all seam allowances. I also printed the template out on cardstock in each size so I could have them available when I needed them. 
Ok so let's get started. So in this first photo I have the two pieces of fabric for the inner layer, pretty sides together ready to sew. 


and we're ready to sew our first seam.

 
Here is the first layer sewn together, then I trimmed the excess fabric.

 
In this step I folded down about 1/4" from the open edges and sewed down a straight line.

 
Here are the outer layers ready to sew, as always, pretty sides together.

                                                  
Here are those layers sewn together and the excess trimmed.


Now, put both pretty sides together, line them up and clip. Sew down the straight edge first and then do the curved part. 

This is everything sewn together.


Trim the excess and turn the mask right side out.


Run a top stitch down the top and bottom of the mask


Top stitching is complete! Almost done I promise!


Fold over the extra on the edges to make the sleeves for the straps.
Sew the straps into place.
You are finished!


Another tip was I used my Cricut Mini Press to help with cutting and pressing the lines so I didn't have my bigger iron to deal with. Once the pattern is cut and you get used to making them you can finish a mask in under 30 minutes. I have made over 100 of them so far and and going to need to replenish my fabric stash when this is all over. (oh and I did my own nails during Quarantine using a Polygel nail kit from Amazon, I didn't go to a salon!)
Happy Crafting!