Friday, December 7, 2012

Snowman Hats!

OMG I'm obsessed with these hats. I found the pattern here. The only thing I did differently was add the crochet roses from my yarn wreath post to accent the adorable top hat.


Monday, December 3, 2012

Yarn Wreath- Winter Edition

Pretty right?

This one was very easy, I used some chunky yarn in 3 colors, Grey, a teal and a varigated green/blue purple.

The roses were croched from a very simple pattern, as long as you can do the main crochet stitches you can make these flowers.

Crochet Rose: (found on youtube but I'll write it out for you)

Use any size yarn/hook depending on how large you want your rose to be. I used 2 different size hooks here.

Leave a long tail for sewing CH 28, sc across, turn work. *sc, hdc, dc, tc, dc, hdc, sc, [all in same stitch]  slip stitch,* repeat to last stitch, do puff stitch. (yo, go in hole of last stitch, yo, pull out, yo (until you have 5 loops on hook) yo and pull through all stitches, cut yarn and sew into shape. Hot glue onto wreath, or sew into scarf or anything else you want to use them for!

Wednesday, November 28, 2012

Sock Monkey Hats

And twins.
 
Seriously, aren't these the cutest little monkeys ever?! My wonderful friend Kat is the mom of these two little darlings and asked me to make them sock monkey hats for the holidays. I happily obliged and couldn't be happier with the turnout.

I used a mashup of a few different patterns and didn't write out my own but if I ever make another one I will try to remember to jot everything down!


Tuesday, November 27, 2012

Crocheted Skirt for Elf on the Shelf

Sittin' Pretty
When I buy something for my daughter, even if a million other people have it, I like to try and make it as custom for her as possible. I know how huge the Elf on the Shelf is and even though we got her a girl elf, who she has named "Snow Angel" she didn't look very girly. So in about 30 minutes I whipped her up a quick skirt and the next morning she was sporting her new fashion from the North Pole.
 
I've written up the pattern, it's very easy! Have at it, and if you make some link me in the comments, I would love to see other color combinations!

Looks like a fuzzy doughnut


So cute!

Monday, November 19, 2012

Pacifier Clips

When my daughter was a few months old I decided to try and make some pacifier clips that I had seen in the store.
it turns out that they're super easy to make, and super cute!


These are for sale now!

Tuesday, November 13, 2012

Minnie Mouse Birthday Party

My daughter turned 3 on Sunday and we also had her birthday party. You guessed it, the theme was Minnie Mouse! Of course I had to add my own twist on it and included zebra, because what's a party without zebra print?!

First, I have to thank my wonderfully talented friend Kat for our invites!


The rest of the pics are pretty self explanatory so here they are!


The cupcakes were dressed up with royal icing bows "glued" on to oreos with mini oreos as the ears.

The cake itself was  6" around, and the topper was made from a styrofoam ball and cardboard covered in fondant. With a gumpaste bow and candy melts for polka dots.

Happy Birthday!

The finished cupcakes!

Up close and personal

Goody bags (Minnie cookies inside) With printed custom thank you card.


Thursday, November 1, 2012

Sewing 101

I finally learned how to thread my sewing machine and get it working, I still have a little ways to go but I'm getting there. At least I can sew in a straight line! I'm very excited to start work on some projects that were put on hold. I'm also very excited for the holidays so I can make some wonderful homemade gifts. I know, "oh joy" but trust me, homemade gifts can be fun, creative and in these tight economic times, nice and friendly to the pocketbook. I may be spending even more time on Pinterest than usual to get some inspiration.
What the heck did people do before the internet?

Oh, and we're thisclose to getting 200 "likes" on facebook! So please share us with your friends, it's very exciting to have so many readers and I'm looking forward to spending more time crafting and blogging so I can share everything with you!
I hope everyone had a happy and safe halloween!

Wednesday, October 24, 2012

Knit Poncho


I made this poncho for my daughter over a year ago and she still loves to wear it. She can also wear it as a skirt if she really wants to. It's adorable and doesn't take too long to make.

I also made matching fingerless gloves to match. Between the two projects I used less than one skein of yarn. I used Loops & Threads Impeccable worsted weight yarn. It's a pretty soft yarn to begin with but once it's washed, it's super soft.

Monday, October 22, 2012

Candy Corn Costume


Look at this adorable little boy!

I've seen a version of this on Pinterest and no matter how hard I tried I coudn't find a pattern for it. So I made one. Knitting this up only took a couple of days and since I used cotton yarn along with the eyelash it ended up being super warm.

I didn't take exact measurements of this but since it is like a coccoon you could make it a tad bigger or smaller and it could've fit on my almost 3 year old as a dress.

The body of the costume was actually very easy, and the hat I modified from this pattern on Ravelry. I used less decrease rounds and didn't have as severe a point, but if you want a really pointy hat, this pattern would do. I also cast on fewer stitches since it was for an infant.

Materials:
1 ball each of yellow, orange and white cotton yarn
1 ball each of yellow, orange and white eyelash yarn (white is fun fur, yellow and orange are lash max)
size 15 circular needles
tapestry needle.

Both pieces are worked with one strand of cotton worsted weight yarn and one strand of eyelash yarn.

Body:
Cast on 40 sts in yellow, join in round.
Knit for 25 rounds
Switch to orange
Knit for 20 rounds (if you don't want tank top sleeves, knit the extra 5 rows and bid off, if you want sleeves, continue)

Straps:
Cast off 13 sts, knit 4 sts, CO 5, knit 4 sts, CO rest of stitches.

P1, K1, P1, K1 on first strap
Place 2nd group of 4 sts on stitch holder.

go back to first strap and repeat P1, K1, P1, K1 for 15 more rows
Bind off

Pick up second group of stitches for straps and repeat
P1, K1, P1, K1 for 16 rows total.
Bind off

Sew straps to body, or secure with buttons

Optional:
Sew up bottom

Tuesday, September 25, 2012

Crochet Owl Hat

Thanks to Gail Anne Photography for the beautiful photo.
 
I made this hat for my friend's newborn daughter and I was lucky enough to have my work photographed on one of the cutest baby girls I've ever seen! After completing this hat I've decided to open an Etsy shop for my knitted/crocheted items.

I'll try not to plug my store too often but I will leave a link ^ up there for you to take a gander at anything I have for sale.
I'll also be doing giveaways and special coupon codes for my readers.
This hat can be done in many variations but I'm definitely partial to the sleepy eyes. For older babies/kids hell even adults the braids can be omitted.
I'm very excited to add more items to my store and hopefully use up that stash of yarn!

Tuesday, September 18, 2012

um, no one call Hoarders on me, ok?


shout out to my girl Jo-Ann!
Check out this clusterF*&K
I have a serious problem ya'll. It's the yarn, I can't resist it, I'm a crafter obsessed. I literally have a closet full of yarn and yet I can't go to a craft store without buying more of it. You know on Hoarders when they show you piles of crap with new crap still in the bag on top of the old crap. Yeah, that's starting to resemble my yarn stash.


 The thing is, I'm making projects, I'm getting things done but now I just have a bigger list of projects to make, so of course my supplies have to be in order. I'm expecting a shipment of some eyelash yarn for a very special project coming up that I can't wait to share with you.
I love closet organizers
In the mean time I'm going to be heading to Target for more closet organizers. Apparently my current set up can't contain my impressive stash. To help deplete some of it I decided I'm going to use my baby yarn and Homespun yarn to make hats for preemies/infants for my local hospital. I would like to make it a recurring donation so if anyone would like to help please let me know, I'd be happy to take donations of hats and send them along. I'm doing this for 2 reasons. #1 like I said, to put a dent in my stash of yarn that otherwise would just sit there and make room for the yarn i'll be using, and #2. I love the hospital where I gave birth at. It's a wonderful place and I would love to help them out. I know how important it is for these babies to have their hats, and I also know how much crafty moms like myself love to use those all symbolic hospital hats.
I've put my daughter's in a shadow box with her birth info. (I'd post a pic of it but I'm not taking the risk of waking her up)

So, please, if you have A&E on the line, hang up. I don't need an intervention just yet. But, I do have a lot of yarn. ;o)

Saturday, September 15, 2012

Time out for a second to talk about Ebates

I don't know how many of you have seen the commercials for Ebates, but they're not kidding. I have actually gotten checks, in the mail for shopping on line. To date I've gotten over $200! Not only is ebates good for cash back, it's also great for coupons. Anytime I'm online shopping, which is quite a bit. I check there first. They have tons of stores to choose from. And what's almost the coolest part, their referral program. You earn $5.00 for each new person that signs up through you, and they always have some extra bonuses going on. For real, if you haven't checked it out yet, do so. Ebates Rocks.
Ebates Coupons and Cash Back

Wednesday, September 12, 2012

Hulk Ear Flap Hat

This hat was made for my nephew, I couldn't find a pattern so I made one up. I think the hat came out pretty good


View PDF Patern Here

Monday, August 27, 2012

Linkage

Linking to my buddy Sarah's blog.

She's my hippy friend and she has a pretty kick ass blog full of useful tips and some great meal planning!

She also hosts a "Mostly Homemade Mondays" part of her blog where other bloggers can share/link up their pages.

Hop on over and take a look! Frugal by Choice, Cheap by Necessity

Thursday, August 23, 2012

S'mores Cake Batter Fudge

Another pinterest inspired post.


Cake Batter Fudge

looks delicious, doesn't it? and for something that uses the MICROWAVE for dessert, I had to try it, and it came out pretty good! (although next time I will omit the frosting, it's very sweet!)

So  I decided to use chocolate cake instead and add fluff and grahm cracker crumbs to the top and this is what resulted. Came out pretty darn good and seriously, try it. your ass won't thank you but your taste buds will!
 
sorry for the ugly shadow in all of these pics, i'd make a lousy Papa-razza

Hello Kitty Hat


I made this hat for a friend of mine's little girl, she just turned 4 and had a Hello Kitty birthday party. I know it's August, but I couldn't resist practicing my new crocheting skills.

I used bulky yarn and the 6.00mm (J) hook
Base of pattern: Earflap Hat (unfortunately i can't share it because it was purchased)
Additions: ears, whiskers, pink trim and bow accent, button eyes and nose

There is a free pattern here. but I did not use this pattern, it's just what I based my final product off of. The one I did use was similar but I made some changes. I hate that I can't get more specific but due to copyright laws I can't.

I'll need to start writing my own patterns.

Wednesday, August 8, 2012

Cabled Dog Sweater

Before I had my daughter I was obsessed with dressing up my dog, yes I'm one of those people. Although, can you blame me she is adorable.
Yes, she had her own play gym too. ::sigh::
So naturally, i have a whole wardrobe for her, but with everything i've bought her every sweater has been too short. She's very long and lean unlike myself. so i decided to try making a dog sweater. once i figured it out it was pretty easy. she's tiny 4lbs 3oz so i used the small 24 peg loom, and some bulky yarn.

Materials:

  • yarn, either use bulky or do two strands of medium/worsted weight yarn.
  • cable needle (if you're doing cables, if not no biggie)
  • size loom for your doggie, like i said, my dog is tiny, and this sweater probably wouldn't fit a dog much bigger than her but the pattern can be adjusted to fit any size loom!
  • loom tool
  • tapestry needle
  • stitch markers
 This pattern is for a small/teacup dog, so everything is little!

Before you cast on look at your loom. Put the starting peg in front of you, now counting the two middle pegs go out an additional 4 pegs on each side. These 4 pegs on either side of the starting peg will be your leg holes.
Please forgive my horrible diagram, but hopefully it explains it well enough.
Click it to make it bigger!

Cast on normally and knit (all in e-wrap if no cable) if you are doing a cable down the back you need to add a purl stitch before and after your cable stitches. so on the diagram above, the stitch marker would go on the 1st and 4th peg of the cable, and make your purl stitch before and after these.
so, you've cast on and have about 4 inches done. now it's time to make the leg holes.
to do this knit your first two stitches as normal, then once you get to the first stitch that you want to cast off, follow this method.
i'm going to name the pegs A and B, A being the peg on the left and B on the right. take B, put it on peg A, so now you have two loops, knit off stitch, place back on peg B. it sounds complicated but it's really easy. then continue for the next 3 pegs until you have 4 empty pegs. after you have your 4 empty pegs, wrap your working yarn around them as a foundation for the next row and continue on knitting around the loom again until you have 6 pegs to go, repeat cast off of 4 stitches, knit last two pegs.
The round after the leg holes, knit all stitches!
keep knitting until you feel the sweater is long enough.

But wait, you mentioned cables right??
--ah yes, cables.
If you are doing cables i suggest doing them about every 6 rows. and the method i use to cable is pretty simple.

It starts with the row before, when you get to your stitch markers make your wraps for the cable stitches pretty loose, finish out the row.
Once you reach your cable stiches in the cable row (i do a 4 stitch right cross cable, you can do left if you want or add more stitches, but it does get VERY tight to work with, so i found that 4 stitches is plenty and it looks nice).
take your cable needle and pick off the two right stitches starting with the most right, place in back of the pegs.
 move over the two left stitches onto the two right pegs, placing the more right of the pegs on the far right peg, followed by the left peg.
now take your stitches on the cable needle and put them on the empty pegs, knit all 4 stitches and keep going to finish the round.

hopefully i explained that well, i feel like i was speaking another language. i'm going to try and put a video tutorial together for these methods as my diagram drawing leaves something to be desired.

Almost as important as everything else is the bind off. you may be tempted to use the bind off method i described above to finish your project but don't i tell you! it has almost no stretch and your dog will hate you more than he/she will for putting it on them in the first place.

The method i used is called the super stretchy bind off, and it is exactly as it sounds, super stretchy, it's wonderful and i'm actually not scared of most loomed projects now because of finding it.

in a nutshell the super stretchy bind off is very easy. measure your working yarn to about 3 times the length of your loom, add a little extra and cut it off, thread it through your tapestry needle.

skipping peg one, put your needle up through peg 2 and keeping the yarn infront of peg 1 so now there are 2 strands of yarn on peg 1, pull the yarn taught, now, go back and put your needle down through the top of peg 1 behind both strands of yarn. skip peg 3, go up peg 4, and back down through peg 3, all the way across until you've reached the last peg, and work back over peg 1 to make sure you have a good closure. now, be brave and pull all of the work off your loom. i'll wait...

see! isn't it pretty? and stretchy?!? good. now weave in your ends and you're done!

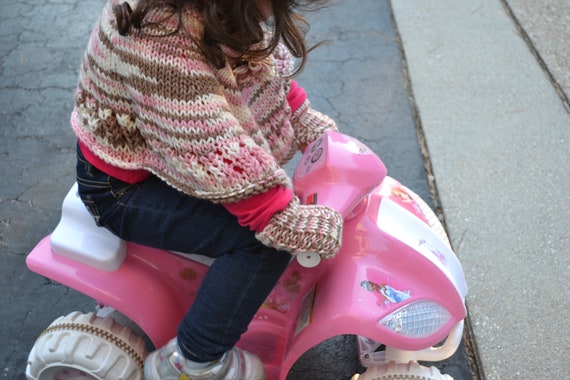
The final product on my beautiful model Layla

She was too ashamed to show her face

she seriously wouldn't look at me, i took at least 20 pictures

that about sums it up, no?


Monday, July 30, 2012

Butternut Squash Carbonara and 100 Fans!

ok, we still do Emeals and I still love it. Because I get took cook things like Butternut Squash Carbonara and it's LOW FAT. Yum.

Here's how you make it:


6 slices turkey bacon

2 c diced butternut squash

1/2 box thin spaghetti

(2 egg yolks, 2 T FF milk, ¼ c Parmesan cheese)

(1 t minced garlic, 1 T sage - chopped, pepper)


First, get your water boiling for the pasta and start cooking that. then you can cook the bacon in a big skillet, i use my nice 10" skillet with a little FF cooking spray. Once the bacon is cooked, take it out of the pan and let it dry on some paper towels.
once you take the bacon out, cook your squash in the bacon fat. there won't be much at all since it's turkey bacon but it helps. at this point also add your garlic, sage and pepper to your skillet. you can also return the bacon to the pan too. if you need more cooking spray go ahead. i used quite a bit. 
the squash takes about 10 minutes so plan accordingly with your pasta because the rest of it goes fast. once your squash is done, take it off the heat. 
take your egg yolks, milk and parm cheese and mix it in a small bowl. then add your pasta (with a little water) to the pan, mix everything up.
add the egg/cheese mixture to the pan, let it coat everything nicely.
Done.

Delish, and I'm not much of a squash person. but, seriously yummy.


And....we've reached 100 fans on facebook!! YAY!

I'm so excited to have more readers!


Monday, July 23, 2012

Chocolate Chip S'more Cookie Cups

Seriously, all I'm going to say about these is YUM.

So easy to make. All you need is:

Package of ready to bake chocolate chip cookie squares
Mini Marshmallows
Chocolate bar
Mini muffin tin


press the cookie squares into the muffin tin cups
sprinkle on the marshmallows
put a piece of chocolate in the middle

bake at 350 for about 12 minutes

seriously, that's it.
oh and EAT THEM ALL


Saturday, July 21, 2012

Dixie Cup Dispenser revamp

I bought a dixie cup dispenser a while ago and it wasn't horrible looking, just plain. So I decided I'd try my hand at using mod podge (but it was the martha stewart version, kind of eh about it) and some scrapbook paper.

Honestly, one of the easiest things I've ever done.

Materials:

Scrapbook paper
Scissors
Mod Podge (or any other decoupage medium)
Dixie cup dispenser
Ruler/tape measure

1. Measure around your dixie cup dispenser, and mark lines on your scrapbook paper
2. Cut the scrapbook paper to size, being sure check your measurements. What's the saying "measure twice, cut once"? yeah, do it that way.
3. First layer of mod podge is to glue your paper to the dispenser. let this dry for a few hours.
4. Now you can add a coat to the top, make sure you do an even layer.
5. You can do an additional coat if you want, this will help keep it waterproof.
and Voila!!


Isn't that pretty?!
If you don't have scrapbook paper you could also use comic book pages or even a picture!

Wednesday, July 18, 2012

Pink and Zebra TuTu


This one's also no-sew. But it was made with ribbon, and in a nod to my daughter's big girl room theme (Hot Pink and Zebra!)
Here's the TuTu:

Same basic principle as before only instead of the cotton loops i used one large piece of satin ribbon, and a lot of tulle. (60 pieces) it wrapped tighter than on the cotton so there was room for more, which just means more poof!

So, I wrapped all the tulle, then I cut lengths (about 17" long) of grosgrain ribbon (be sure to use Fray Check or a lighter/match to secure your ends!) and tied a knot between the other knots above. nothing too techinical.


Another advantage of having it on the ribbon is that the length can be adjusted as your little girl grows!


*Idea for this method is from Treasures for Tots*