Showing posts with label yarn. Show all posts

Thursday, June 9, 2016

Pattern Talk: Paid Vs. Free

I've been meaning to write about this for awhile. When I ventured out past the world of scarves and blankets I was starting to look at more and more patterns. Before Pinterest came along, I depended mostly on Ravelry (and still do) when I'm looking for a pattern.


Without fail, every time I was searching for an idea, the first thing I would do was check off that little box next to "Free" there was no way I was paying for a pattern. I no longer do this and I'll tell you why. Pattern writing is not easy. For anyone that's attempted it, it can be daunting and there are a lot of little parts that go into it. And while it's not the case every time, there's a reason why some patterns are paid and some are free.

For a pattern to be a "good" pattern it needs to meet certain criteria.
1. Write out all special stitches, notes, and materials needed.
2. Stitch count at the end of each row (very important!!!)
3. Clear, well thought out instructions.

Sometimes when you're doing a stitch or pattern you've done forever it doesn't occur to you that someone looking at it with fresh eyes might have a hard time with it, it's best to spell everything out as clearly as possible.

This isn't to say that there shouldn't be free patterns or that all free patterns are crappy, of course not. But what I'm getting at here is don't write a pattern off because it's not free. If it's for a project you're making for a customer you will more than make your money back. And even if it's for a gift, in my opinion I'd rather pay for a pattern and come out with a finished project I love than something that doesn't look as nice but the pattern was free.
Of course, I do realize that not everyone can afford to pay for patterns and I know that there are TONS of designers that do offer their designs for free. The lesson here is, they are both wonderful options and I'm so grateful to the designing community out there for sharing their creativity. I've only dabbled in the world of pattern making (mostly graphs) and it can be stressful so I truly appreciate all of the hard work, patience and time that goes into making them.

While I'm talking about Paid patterns I would like to shine a spotlight on one designer in particular- One & Two Company who saved me from project hell this week without even knowing it. (Which led me to write this post, lol) I was needing a pattern for a Sea Turtle. I searched Ravelry, Etsy and Pinterest and kept seeing her pattern, I favorited and kept going. Ultimately I chose a free one from Ravelry because, well, it was free and it looked easy enough. Wrong. After I completed the parts for the shell and joined them, the instructions for the rest of the shell were a disaster. No row counts, and the pattern in general was sloppily written and just not good. I decided to cut my losses and went back to my first choice Bob the Turtle. I absolutely ADORE this pattern. It is very well done, lots of illustrations, I would buy all of her patterns if I could afford them. Bob is going to be a birthday gift for a special little girl, so I will be sharing the finished project after he is in his forever home.

There is a sale going on right now on her site! (*I have not been asked or paid to share this information with you*)

“Stock Up for Summer Sale!” and get great discounts!!!
· From 1 to 4 patterns you will get 40% Off
· With 5 or more patterns you will get 50% Off
No Coupon Code needed. June 9 - 11, 2016. Packs not included.
Only on the website:

Lesson learned for me. All patterns are not created equally and don't shy away from the paid ones, while they're not all perfect ( I know mine aren't but I do my best) give them a shot! You might be pleasantly surprised!

What do you think? Do you ever buy patterns? Do you have a pattern wish list like I do?

Happy Crafting!

Wednesday, July 16, 2014

Elsa and Anna Hats


I had so much fun making these hats!
Now, unfortunately I didn't come up with the patterns and they weren't free, BUT they were a pretty good value and I would recommend them because they work up pretty quick!!

The listing for the FINISHED HATS is here.

The listing for the PATTERNS is here. 
*One quick note on the Elsa pattern, it is called for to thread your bead on the yarn when making the crown, I found it much easier to thread it onto the pipe cleaner instead*

Monday, March 3, 2014

Zig Zag Ombre Cowl

This cowl pattern is adapted from a free pattern I saw on RAKJ Patterns. Instead of making an entire scarf, I just stopped after 6 repeats of the pattern, and sewed up the seam. *UPDATED with better pictures. 5/22/14*


Now, because of all the color changes it does take awhile to finish, but I think it's worth it. I love the colors. For this cowl I used Bernat's Vickie Howell Sheep(ish) yarn in Tealish, Turquoiseish, and Robin Eggish. This created a beautiful Ombre effect. There are a few colorways in this yarn that would make a beautiful ombre look.
If you do not want to deal with the color changes it would also just make a pretty texture effect. I do love the original pattern but this was a fun way to change it up and still get the look I was going for.
The lesson here is,don't be afraid to experiment with existing patterns and make them your own!

Wednesday, October 30, 2013

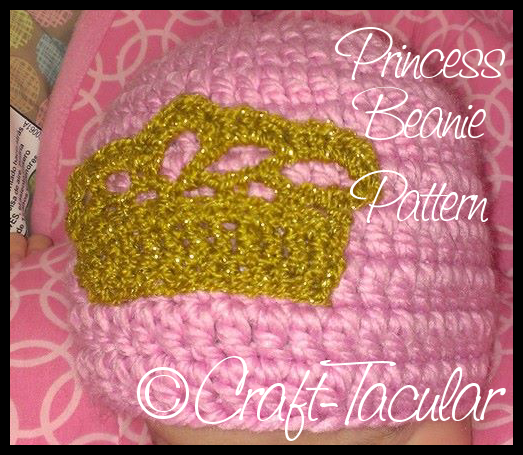
Princess Beanie Pattern

 
For Halloween this year my little one is going to be Sleeping Beauty, a cute headband came with her costume but for where we live she needed something warmer to go trick-or-treating with her sister. So I decided to make her a hat with a gold crown applique.

For the hat I used Loops and Threads Charisma yarn in pink with a 5.00mm hook.
For the crown I used Vanna's Glamour Yarn in Gold. I also bought the silver to try and it looks just as cute! This is a sport weight yarn so I used a 3.75mm hook.
This hat was made in size 3-6 months and I follow the template from Sarah over at Repeat Crafter Me.

Bulky yarn and 5.00 hook was used for this hat.

Pattern   (3-6 months):
Round 1: Magic Ring DC11 into ring, join to first DC, ch2
Round 2: 2DC around, join to first DC, ch2
Round 3: *2DC, DC in next* around, join to first DC, ch2
Round 4: *2DC, DC in next two* around, join to first DC, ch2
Round 5: *2DC, DC in next 10* around, join to first DC, ch2
Round 6-11 DC in each around, join to first DC, ch2
Fasten off, weave in ends.

Crown Applique: Pattern modified from Little Frills Designs
Ch 13 loosely
Row 1: SC in 2nd stitch from chain, sc across, turn
Row 2: DC across, turn
Row 3: SC across, turn
Row 4: *Ch3, skip 1, SC into next st* repeat 4 times so you have 5 "loops"
Row 5: Ch6, 1 DC into first loop, ch4, DC into next loop, ch6, 1 DC into next loop, ch4, 1 DC into next loop, ch6, 1 DC into last loop slip stitch into last st, turn
Row 6: HDC 6 into first loop, HDC 4 into second loop, HDC 2, DC 2, HDC 2, into third loop, HDC 4 into fourth loop, HDC 6 into last loop. Fasten off, leave a long tail for sewing.

Sew the applique to the hat, gloves, headband or whatever it is needs the royal treatment.
Happy Halloween!


Sunday, July 28, 2013

Ombre Yarn Letters

I tried making some letters for the new baby's room, and they came out cute, but look like there more for an older girl's room than for a nursery. So I decided to go in a different direction and start over.
These were the original ones.
 The original letters were done with 8x8 canvases, some letters, buttons, ribbon and a shit ton of glitter! These match the chevron blanket that I made but overall the new letters go with the nursery much better.

Materials:
New letters from Jo-Ann with Lion Brand Baby's First cotton yarn
Letters from Jo-Ann Fabrics
Lion Brand Baby's First cotton yarn (bulky weight)
LOTS of glue from the glue gun
-patience. I recommend doing a test wrap without glue to figure out where you're going to put all of your yarn before starting. I had to re-do the "E" before I got it right.
Because I did ombre it was a little more time consuming, but I love the way they turned out! (This would also be a great project for a monogram!)
Applique sources are listed below the pictures.
 My other piece of advice is this. Take your time! I stared at these things for weeks before I sat down to do them, I took some quiet time, put on some music and just did it.
I also took some paper and sectioned out the letters on where I wanted to change colors. You can barely see it in the top picture, but those were my very rough reference marks. it will make your life easier, just do it with something light and not a sharpie, you don't want your yarn to show through.


My Instagram pic of the work in progress

The Finished product!
 All done!! This was a super fun project and I'm very glad I got them done in time for the baby's arrival!
I love this owl!

 The M's were pretty tricky, but I figured out that if you cut small strips and lay them down in the glue it's much easier than trying to wrap around the triangle shape...that goes for the tops of the M too, once you do that you can glue down the fringe and just wrap over it so it looks seamless. Each letter poses it's own challenge but once you get the hang of it, it will go pretty quickly.
The Rose mentioned in my other posts, I added a slip stitch of the yellow to make it two-toned. I also did the foundation chain in yellow but you can't really see that.

Another close-up of hoots!
Applique sources:

ALL FREE PATTERNS!

*I found the pattern for "hoots" as I've named him, I got it from this pattern on ravelry.
*Flower on the 2nd "M" is here - I modified the pattern a bit and did the same stitch repeat for the rose (sc, hdc, dc, hdc, sc) for each of the main petals instead of what the pattern called for.
*The rose is the same I used on my crochet flip flops and winter wreath posts.
* Flower on 1st "M" is here- I also modified this one and I only did one layer. I probably should've done more as I wanted to include more colors but I was exhausted and I liked how it looked after one round of petals.

Sunday, March 10, 2013

Crochet Cupcake Earflap Hat

Inspired by the cupcake blanket I made I wanted to continue the theme and make a cupcake hat for my 3 year old.


Basically what I did was follow a basic pattern for a earflap hat, and I sewed on the cupcake applique.

I think it came out really cute, the only thing I will do differently next time is make the applique smaller so it doesn't take up so much of the hat.
But besides that, I love it.

The entire hat is made out of 100% cotton yarn, now that spring is approaching (YAY!) I didn't want her to sweat wearing it. And of course, it's washable, so what's better than that with a 3 year old.

Here's what I did: (This pattern is from Repeat Crafter Me, I use this base for all of my hats.)

Hat in toddler/preschool size:

Magic Ring, Chain 2, 9 DC in magic ring, join to first DC, ch 2
Round 2: 2 DC in each around, join to first DC, ch 2 (18 DC)
Round 3: 2 DC, DC in next, repeat around, join, ch 2 (27 DC)
Round 4: 2 DC, DC in next 2, repeat around, join, ch 2 (36 DC)
Round 5: 2 DC, DC in next 3, repeat around, join, ch 2 (45 DC)
Round 6: 2 DC, DC in next 4, repeat around, join, ch 2 (54 DC)
Round 7: DC around (54 DC)
Change color, join and ch 2
Round 8-12: DC around (54 DC) fasten off and find a point to make your earflaps (i like to do mine on the sides so the seam is in the back)

Earflap 1:
Row 1: Chain 2, HDC 12, chain 2, turn
Row 2: HDC decrease, HDC in next 8, HDC decrease, chain 2, turn
Row 3: HDC across, chain 2, turn (10 HDC)
Row 4: HDC decrease, HDC in next 6, HDC decrease, chain 2, turn
Row 5: HDC across, chain 2, turn (8 HDC)
Row 6: HDC decrease, HDC in next 4, HDC decrease, chain 2, turn
Row 7: HDC across, chain 2, turn (6 HDC)
Row 8: HDC decrease, HDC in next 2, HDC decrease, chain 2, turn
Row 9: 2 HDC decreases, chain 2, turn
Row 10: HDC decrease, fasten off leaving long tail.

Earflap 2:
Leaving 23 stitches along the front for child size hat, 25 stitches along the front for adult size hat...
Row 1: Chain 2, HDC 12, chain 2, turn
Row 2: HDC decrease, HDC in next 8, HDC decrease, chain 2, turn
Row 3: HDC across, chain 2, turn (10 HDC)
Row 4: HDC decrease, HDC in next 6, HDC decrease, chain 2, turn
Row 5: HDC across, chain 2, turn (8 HDC)
Row 6: HDC decrease, HDC in next 4, HDC decrease, chain 2, turn
Row 7: HDC across, chain 2, turn (6 HDC)
Row 8: HDC decrease, HDC in next 2, HDC decrease, chain 2, turn
Row 9: 2 HDC decreases, chain 2, turn
Row 10: HDC decrease, chain 1, turn
Continue to SC around the entire hat. Join to first SC and fasten off, leaving long tail.
 
Cupcake Applique: (I fould this pattern on Louie's Loops and it's supposed to be for coasters, but I adapted it for the hat and made some changes to the frosting part, it was confusing and didn't look right to me)
 
Materials:
(basically any 100% cotton works)
-Needle to sew in ends with
Abbreviations:
-SL.ST = Slip Stitch
-SC = Single Crochet
-HDC = Half Double Crochet
-DC = Double Crochet
-Ch = Chain
-Rnd = Round
In color A (brown) Ch 10
Rnd 1: Sc 8, turn.
Rnd 2: ch 1, sc 8 in back stitches
Rnd 3 – 14: Repeat x 12 (14 total)
Change to color B
Rnd 15: ch 1, Sc 1 in the sides of each row 14, turn. [Don’t cut, Leave color B attached] (14)
Change to color C
Rnd 16: ch 1, sc 2 in first, sc 1 in next 12, sc 2 in next, turn. (16)
Rnd 17: Don’t ch, skip first st, sc 1 in next 14, stop one early, turn. (14)
Rnd 18: ch 1, sc 1 in each, turn. (14)
Rnd 19: Don’t ch, skip first st, sc 1 in next 12, stop one early, turn. (12)
Rnd 20: ch 1, sc 1 in each, turn. (12)
Rnd 21: Repeat (12)
Rnd 22: Don’t ch, skip first st, sc 1 in each, turn. (11)
Rnd 23: Repeat (10)
Rnd 24: Repeat, cut and tie off. (9)
*For Cherry, count in three stitches from top, pull through in the fourth st from end on Rnd 24…
Rnd 25: sc 1 in fourth from the end and next two, turn. (3)
Rnd 26: Don’t ch, skip first st, sc 1 in next 2, turn. (2)
Rnd 27: Don’t ch, skip first st, sc 1 in the last st, cut and tie off. (1)
*For lining
Rnd 28: Using the color B left off and uncut from Rnd 15, pull one through the end of Rnd 15 and sc 1 in each Rnd and st around the piece, cut and tie off, sew the remainders into the piece. (≈59)
So that is how I did this hat. I've found that you can make a basic hat shape and do anything with it, animal faces, appliques, bows, pom poms, anything at all. I'm having lots of fun coming up with different combinations!

Thursday, February 28, 2013

Cupcake Baby Blanket

I saw this pattern on pinterest awhile ago and wanted to make a cute blanket for spawn #2. Since we don't know what we're having yet I wanted it to be gender neutral, although I confess, even after adding green to the border it's still pretty girly.

I made the blanket a lot smaller than it was originally supposed to be, but oh well, it's for an infant.  My daughter never really used the blankets I made her before she was born and who am I kidding, I wanted to try a new crochet pattern.

The way the pattern is written is very confusing at first, but once you get the hang of it it's not so bad. Because I would always fall asleep around 9pm it did take me a while to finish but, it's done!
 
It's hard to see because of how I took the photo but every 2 rows makes up some cupcakes. I really enjoyed it and am trying to think of other ways to use the cupcake motif in a pattern.

Updated: Here's a better picture!

Monday, January 21, 2013

Loom Knit Fingerless Gloves


Loom Knit Fingerless Gloves

Materials:
Small (blue) loom
Bulky yarn (or double stranded worsted weight yarn)
Tapestry needle
Loom tool

*Before you cast on you may want to use stitch markers (or do what I do and just write on your loom with a sharpie) to distinguish your 4 pegs that will become your thumb hole. * 

Seriously the easiest pattern ever, these gloves work up super quick and if you use the bulky yarn they’re very warm!

Cast on all pegs.

Knit around for 20 rows

On row 21, make thumb hole (use technique described in the Cabled Dog Sweater post) but just make one, duh!

Knit around for 6 more rows

Super stretchy bind off (also mentioned in great detail in the Cabled Dog Sweater post)

That’s it, you’re done!


PDF download here.

Monday, December 3, 2012

Yarn Wreath- Winter Edition

Pretty right?

This one was very easy, I used some chunky yarn in 3 colors, Grey, a teal and a varigated green/blue purple.

The roses were croched from a very simple pattern, as long as you can do the main crochet stitches you can make these flowers.

Crochet Rose: (found on youtube but I'll write it out for you)

Use any size yarn/hook depending on how large you want your rose to be. I used 2 different size hooks here.

Leave a long tail for sewing CH 28, sc across, turn work. *sc, hdc, dc, tc, dc, hdc, sc, [all in same stitch]  slip stitch,* repeat to last stitch, do puff stitch. (yo, go in hole of last stitch, yo, pull out, yo (until you have 5 loops on hook) yo and pull through all stitches, cut yarn and sew into shape. Hot glue onto wreath, or sew into scarf or anything else you want to use them for!

Wednesday, November 28, 2012

Sock Monkey Hats

And twins.
 
Seriously, aren't these the cutest little monkeys ever?! My wonderful friend Kat is the mom of these two little darlings and asked me to make them sock monkey hats for the holidays. I happily obliged and couldn't be happier with the turnout.

I used a mashup of a few different patterns and didn't write out my own but if I ever make another one I will try to remember to jot everything down!


Wednesday, October 24, 2012

Knit Poncho


I made this poncho for my daughter over a year ago and she still loves to wear it. She can also wear it as a skirt if she really wants to. It's adorable and doesn't take too long to make.

I also made matching fingerless gloves to match. Between the two projects I used less than one skein of yarn. I used Loops & Threads Impeccable worsted weight yarn. It's a pretty soft yarn to begin with but once it's washed, it's super soft.

Monday, October 22, 2012

Candy Corn Costume


Look at this adorable little boy!

I've seen a version of this on Pinterest and no matter how hard I tried I coudn't find a pattern for it. So I made one. Knitting this up only took a couple of days and since I used cotton yarn along with the eyelash it ended up being super warm.

I didn't take exact measurements of this but since it is like a coccoon you could make it a tad bigger or smaller and it could've fit on my almost 3 year old as a dress.

The body of the costume was actually very easy, and the hat I modified from this pattern on Ravelry. I used less decrease rounds and didn't have as severe a point, but if you want a really pointy hat, this pattern would do. I also cast on fewer stitches since it was for an infant.

Materials:
1 ball each of yellow, orange and white cotton yarn
1 ball each of yellow, orange and white eyelash yarn (white is fun fur, yellow and orange are lash max)
size 15 circular needles
tapestry needle.

Both pieces are worked with one strand of cotton worsted weight yarn and one strand of eyelash yarn.

Body:
Cast on 40 sts in yellow, join in round.
Knit for 25 rounds
Switch to orange
Knit for 20 rounds (if you don't want tank top sleeves, knit the extra 5 rows and bid off, if you want sleeves, continue)

Straps:
Cast off 13 sts, knit 4 sts, CO 5, knit 4 sts, CO rest of stitches.

P1, K1, P1, K1 on first strap
Place 2nd group of 4 sts on stitch holder.

go back to first strap and repeat P1, K1, P1, K1 for 15 more rows
Bind off

Pick up second group of stitches for straps and repeat
P1, K1, P1, K1 for 16 rows total.
Bind off

Sew straps to body, or secure with buttons

Optional:
Sew up bottom

Tuesday, September 25, 2012

Crochet Owl Hat

Thanks to Gail Anne Photography for the beautiful photo.
 
I made this hat for my friend's newborn daughter and I was lucky enough to have my work photographed on one of the cutest baby girls I've ever seen! After completing this hat I've decided to open an Etsy shop for my knitted/crocheted items.

I'll try not to plug my store too often but I will leave a link ^ up there for you to take a gander at anything I have for sale.
I'll also be doing giveaways and special coupon codes for my readers.
This hat can be done in many variations but I'm definitely partial to the sleepy eyes. For older babies/kids hell even adults the braids can be omitted.
I'm very excited to add more items to my store and hopefully use up that stash of yarn!

Tuesday, September 18, 2012

um, no one call Hoarders on me, ok?


shout out to my girl Jo-Ann!
Check out this clusterF*&K
I have a serious problem ya'll. It's the yarn, I can't resist it, I'm a crafter obsessed. I literally have a closet full of yarn and yet I can't go to a craft store without buying more of it. You know on Hoarders when they show you piles of crap with new crap still in the bag on top of the old crap. Yeah, that's starting to resemble my yarn stash.


 The thing is, I'm making projects, I'm getting things done but now I just have a bigger list of projects to make, so of course my supplies have to be in order. I'm expecting a shipment of some eyelash yarn for a very special project coming up that I can't wait to share with you.
I love closet organizers
In the mean time I'm going to be heading to Target for more closet organizers. Apparently my current set up can't contain my impressive stash. To help deplete some of it I decided I'm going to use my baby yarn and Homespun yarn to make hats for preemies/infants for my local hospital. I would like to make it a recurring donation so if anyone would like to help please let me know, I'd be happy to take donations of hats and send them along. I'm doing this for 2 reasons. #1 like I said, to put a dent in my stash of yarn that otherwise would just sit there and make room for the yarn i'll be using, and #2. I love the hospital where I gave birth at. It's a wonderful place and I would love to help them out. I know how important it is for these babies to have their hats, and I also know how much crafty moms like myself love to use those all symbolic hospital hats.
I've put my daughter's in a shadow box with her birth info. (I'd post a pic of it but I'm not taking the risk of waking her up)

So, please, if you have A&E on the line, hang up. I don't need an intervention just yet. But, I do have a lot of yarn. ;o)

Wednesday, September 12, 2012

Hulk Ear Flap Hat

This hat was made for my nephew, I couldn't find a pattern so I made one up. I think the hat came out pretty good


View PDF Patern Here

Thursday, August 23, 2012

Hello Kitty Hat


I made this hat for a friend of mine's little girl, she just turned 4 and had a Hello Kitty birthday party. I know it's August, but I couldn't resist practicing my new crocheting skills.

I used bulky yarn and the 6.00mm (J) hook
Base of pattern: Earflap Hat (unfortunately i can't share it because it was purchased)
Additions: ears, whiskers, pink trim and bow accent, button eyes and nose

There is a free pattern here. but I did not use this pattern, it's just what I based my final product off of. The one I did use was similar but I made some changes. I hate that I can't get more specific but due to copyright laws I can't.

I'll need to start writing my own patterns.

Friday, June 1, 2012

Knit iPad2 Case


I realize that my photography skills, or lack therof are leaving a lot to be desired but it's the best shot i could get of this with my camera phone. This was knit on a round loom (mine is the Orange loom from Boye with 36 pegs) The knifty knitter version is green.

This is the Pattern

Use bulky yarn, or use double strand worsted weight yarn.

E-Wrap for 12"
Cast off
Sew up one end for the bottom.
Take the top of your sleeve, crease it in half, put half of the stitches back on the loom, and continue to e-wrap a flat piece (left to right then right to left, or honestly it doesn't matter which direction you go, whatever you're comfortable with)
Do this for another 6"
Bind off

You are done!!

Now, if you don't want to cast the whole thing off and re-do 1/2 stitches you can just cast off half of the stitches, cut your yarn to weave in and continue making the flap from there. I might try this next time as I had a small issue with the stitches lining up with the rest of the work.
Obviously you can change the pattern and knit the whole thing instead of e-wrapping, finishing with a button, or adding in cables, which will be my next attempt. Overall it's a great way to get familiar with loom knitting and it's something else do make besides a hat!

If you like this project please feel free to Pin it!

Happy Knitting!

Monday, March 12, 2012

New season, New wreath!

I went ahead and made a yarn wrapped wreath. and while i'm super happy with the final product, there are always a few things i would change for next time.

I have some progress pictures for this post! Yay!
First, the materials"

  • Foam wreath ring
  • Yarn
  • Flowers with clips
  • Peacock feathers
  • Ribbon
  • Hot glue gun
*Patience*

The Wreath took almost 2 hours to wrap, but it came out nice!
And the finished product!
And here it is on the door!

Happy Spring!